Chapter 06은 드디어 자바스크립트를 다룬다.
솔직히 css 너무 어려웠다 ㅠㅠ 물론 js도 너무 어렵다 ㅜㅜㅜㅜ
Javascript 란?
간단하게 설명하자면 웹페이지에 생동감을 넣어주기 위해 만들어진 언어이다.
다양한 이벤트 (ex. 마우스 클릭) 로 어떠한 동작을 하도록 할 수 있다.
html 파일에서 자바스크립트를 사용하는 방법은 크게 두 가지이다.
1. HTML 파일 내부에 자바스크립트 연결하기
<!DOCTYPE html>
<html lang="en">
<head>
<meta charset="UTF-8">
<meta name="viewport" content="width=device-width, initial-scale=1.0">
<title>Document</title>
<script type="text/javascript">
console.log("Hello World!!!!!!!!!!!");
</script>
</head>
<body>
</body>
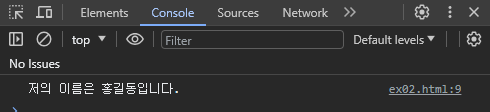
</html>이렇게 <head> 부분에 <script> 태그를 넣어서 태그 내부에서 작성할 수 있다.
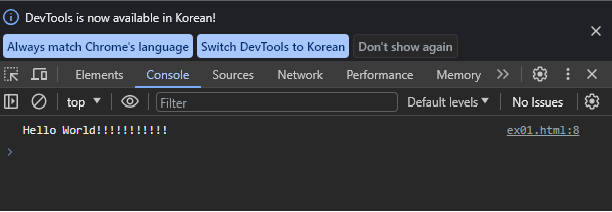
해당 페이지의 console 에 들어가보면 출력된 걸 확인할 수 있다.
2. HTML 파일과 외부 자바스크립트 연결하기
<!DOCTYPE html>
<html lang="en">
<head>
    <meta charset="UTF-8">
    <meta name="viewport" content="width=device-width, initial-scale=1.0">
    <title>Document</title>
    <script defer src="custom.js"></script>
</head>
<body>
</body>
</html>
위의 <script> 태그안에 경로 입력 전에 defer 를 입력한다 ( 이러면 웹 브라우저의 해석기가 <body>를 해석하면서
js파일을 가져온다.
console.log("HELLOOOOOOO WOOOOOOOORLD!!!!!!!!!!!!!!!!!!!!!!!!");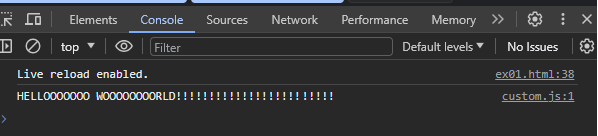
HTML 요소 선택하기
document.querySelector() - 요소 선택하기
[html]
<!DOCTYPE html>
<html lang="en">
<head>
    <meta charset="UTF-8">
    <meta name="viewport" content="width=device-width, initial-scale=1.0">
    <title>Document</title>
    <script defer src="custom.js"></script>
</head>
<body>
    <section id="wrap">
        <article class="box1">TEXT1</article>
        <article class="box2">TEXT2</article>
        <article class="box3">TEXT3</article>
    </section>
</body>
</html>
[javascript]
const frame = document.querySelector("#wrap");
console.log(frame);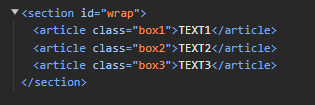
-> 아이디가 wrap이라는 요소를 찾아서 출력하는 코드
document.querySelectorAll() - 요소 모두 선택하기
const frame = document.querySelectorAll("#wrap article");
console.log(frame);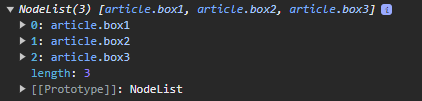
요소를 여러개 찾으면 NodeList라는 배열에 저장되어서 나온다.
만약 요소를 한개씩 출력하고 싶으면 배열을 for of 문을 활용해서 출력한다.
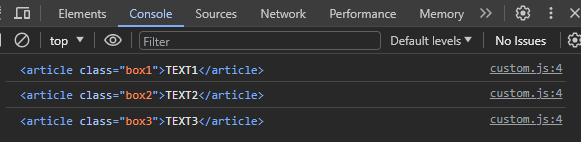
const items = document.querySelectorAll("#wrap article");

for(let item of items){
    console.log(item);
}
결과는 다음과 같이 나온다.
부모요소, 자식요소 선택하기
[html]
<body>
    <ul class="list">
        <li class="item1">item1</li>
        <li class="item2">item2</li>
        <li class="item3">item3</li>
        <li class="item4">item4</li>
    </ul>
</body>
[js]
const list = document.querySelector(".list");
const items = list.children;    // 자식 요소 선택

console.log(items);
console.log(items[0]);
console.log(items[1]);
console.log(items[2]);
console.log(items[3]);

const item = document.querySelector(".item2");
console.log('--------> 아래는 부모 요소')
console.log(item.parentElement);    /*부모 요소 선택 */
console.log('--------> 아래는 형제 요소')
console.log(item.previousElementSibling);    /*형제 요소 선택 */
console.log(item.nextElementSibling);    /*형제 요소 선택 */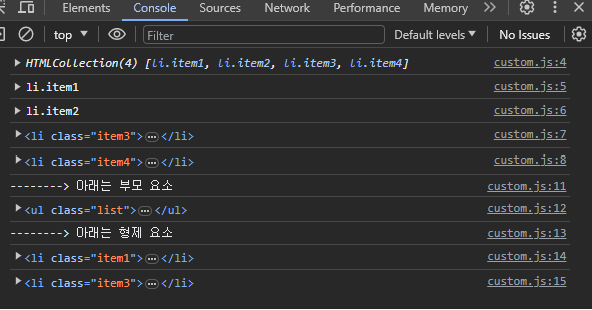
자바스크립트 이벤트
마우스 클릭 이벤트
html
<a href="https://www.naver.com">click</a>css
a {
    font-size: 100px;
    color: #555;
}
js
const link = document.querySelector("a");

link.addEventListener("click", (e)=>{
    e.preventDefault();
    console.log("링크를 클릭했습니다.");
});
호버 이벤트
마우스를 올리면 발생하는 이벤트이다.
mouseenter(), mouseleave()
html
<!DOCTYPE html>
<html lang="en">
<head>
    <meta charset="UTF-8">
    <meta name="viewport" content="width=device-width, initial-scale=1.0">
    <title>Document</title>
    <link rel="stylesheet" href="css/hover.css">
    <script defer src="js/hover.js"></script>
</head>
<body>
    <div id="box"></div>
</body>
</html>
css
#box {
    width: 200px;
    height: 200px;
    background-color: aqua;
    margin: 100px auto;
}
js
const box = document.querySelector("#box");

console.log(box);

box.addEventListener("mouseenter", ()=>{
    box.style.backgroundColor = "hotpink";
});

box.addEventListener("mouseleave",()=>{
    box.style.backgroundColor = "aqua";
});
See the Pen Untitled by yejin (@geniest) on CodePen.
비슷하게 img 태그에 onmouseover, onmouseout 속성을 적용하여 hover를 구현할 수 있다.
<!DOCTYPE html>
<html lang="en">
<head>
    <meta charset="UTF-8">
    <meta name="viewport" content="width=device-width, initial-scale=1.0">
    <title>Document</title>
    <script type="text/javascript">


        function changeImg(){
            var img = document.getElementById("poster");
            img.src = "../movie/movie_image2.jpg";
        }

        function changeImg2(){
            var img = document.getElementById("poster");
            img.src = "../movie/movie_image1.jpg";
        }
    </script>
</head>
<body>
    <img src="../movie/movie_image1.jpg" alt="" id="poster" onmouseover="changeImg()" onmouseout="changeImg2()">
</body>
</html>
같은 요소에 이벤트 한꺼번에 연결하기
html
<!DOCTYPE html>
<html lang="en">
<head>
    <meta charset="UTF-8">
    <meta name="viewport" content="width=device-width, initial-scale=1.0">
    <title>Document</title>
    <script defer src="custom.js"></script>
</head>
<body>
    <ul class="list">
        <li class="item1">item1</li>
        <li class="item2">item2</li>
        <li class="item3">item3</li>
        <li class="item4">item4</li>
    </ul>
</body>
</html>
js
const list = document.querySelectorAll(".list li");

for(let el of list){
    el.addEventListener("click", e=>{
        e.preventDefault();
        console.log(e.currentTarget.innerText);
    })
}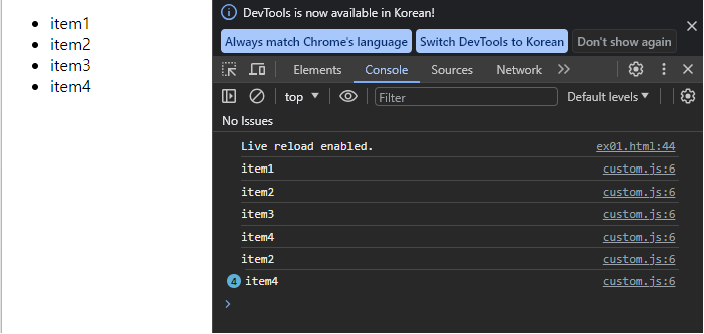
이렇게 리스트의 아이템을 클릭하면 해당 요소가 출력된다.
문자 안에 변수 삽입
여기서 주의할 점은 ' ' 작은 따옴표가 아니라 ` ` 백틱 기호를 써야한다.
JS 예제 )
See the Pen Untitled by yejin (@geniest) on CodePen.
자바스크립트로 클래스 제어하기
책보고 예제 따라함
See the Pen class by yejin (@geniest) on CodePen.
근데 원리가 좀 헷갈린다... ㅠㅠ 좀 더 생각해봐야겠음
'스터디 > front' 카테고리의 다른 글
| Do It! 인터랙티브 웹 페이지 만들기 | Chapter05 정리 (0) | 2023.10.19 |
|---|---|
| Do It! 인터랙티브 웹 페이지 만들기 | Chapter04 정리 (0) | 2023.10.10 |
| Do It! 인터랙티브 웹 페이지 만들기 | Chapter03 정리 (2) (0) | 2023.10.10 |
| Do It! 인터랙티브 웹 페이지 만들기 | Chapter03 정리 (1) (0) | 2023.09.26 |
| Do It! 인터랙티브 웹 페이지 만들기 | Chapter02 정리 (0) | 2023.09.19 |